
About eight weeks ago I posted about our newly-arrived flock
of one hundred chicks. True to my word,
this post follows up with their story.
In an era where most of the population is disassociated from their food
sources, it can be a difficult fact to face that an animal dies in order to be
a part of our diet. On our homestead
this is a revered truth, a part of the circle of life. Processing your own meat isn’t for everyone,
but there are a growing number of people intrigued by skillsets of yesteryear
such as this one. Like my husband and me,
these folks are eager to be more self-sufficient and crave a means to be in
touch with nature and their food. Raising
food at home is also an excellent way to live frugally while eating extraordinarily
well. Chickens are small animals that
are relatively easy to raise and fairly quick to mature; this makes them a good
starting place for those interested in learning how to process their own
meat. Below is a how-to with plenty of
photographs from our most recent chicken-processing experience. Please note that while we borrowed
specialized equipment for this large batch, it is just as simple to do it the
old way when working with smaller batches of birds (hot water in a pot for
scalding and hand-plucking the feathers).
To everything there is a season and on our farm this year the season for
meat chickens has come to a close.
Please Note: Due to the How-To nature of the topic, this post contains somewhat graphic images of the transition from a live chicken to a kitchen-ready carcass. This is not meant to shock readers, but rather to educate those interested in the step-by-step process of a truly local, farm-raised, homestead kitchen staple.
Please Note: Due to the How-To nature of the topic, this post contains somewhat graphic images of the transition from a live chicken to a kitchen-ready carcass. This is not meant to shock readers, but rather to educate those interested in the step-by-step process of a truly local, farm-raised, homestead kitchen staple.
There is very little uniformity in nature, so don’t expect
factory-farmed precision in this process.
Different breeds of birds mature at different rates. In the past, we have raised the conventionally-popular
Cornish Cross. However, in recent seasons
we’ve switched to the Freedom Ranger (or Red Ranger) because we prefer the
athleticism and increased foraging ability of this variety. The breast of a Freedom Ranger is also quite
meaty, unlike some of the heritage breeds.
When talking about chickens that are raised for meat, the approximate
window for processing is between 7 and 10 weeks depending on the breed and the
preferred size you want in your kitchen.
Our family prefers a 4-5 lb. carcass weight (that means, in your kitchen
weight vs. live bird weight). Of course, like individuals in a human family,
each bird will develop at a slightly different rate from each other. Expect a variety of weights in your batch,
but shoot for a ballpark processing date when the majority of birds will be at
the ideal size.
 How to Process a Chicken
Don’t be deterred by the exhaustive list below. The instructions seem far more complicated
than the process actually is. It will
get easier with repetition. As always,
use common sense for cleanliness at all times – plenty of ice, running water,
and a cloudy day (or shaded area) are all ideal. Likewise, remember that the inside of this
animal is already “clean”, so do not be distracted by what is not, in fact, a
worry. Feces, dirt, and prompt chilling
should be your primary concern, not slime, guts, or blood.
It is best to start with birds that are at ease. With this in mind, catch them early enough so
they have time to settle down in a crate while you heat water and finish
set-up. If the overnight temperatures
are comfortable, they can even be crated after dark the night before. If it is very hot or muggy, do NOT leave them
in the crate for extended hours or you run the risk of suffocating or severely dehydrating
them. At a minimum, they should be removed from their feed at least a few hours before so that their crop and intestines are somewhat evacuated.
 For “The Deed”: Taking a life is serious business. If this will be a first for you, it’s a good
idea to get mentally prepared beforehand and to remain calm. Remember that your reverence and gratefulness
for this being’s sacrifice is not in vain.
For “The Deed”: Taking a life is serious business. If this will be a first for you, it’s a good
idea to get mentally prepared beforehand and to remain calm. Remember that your reverence and gratefulness
for this being’s sacrifice is not in vain.
As for logistics, we use what’s called a killing cone. This will keep the bird confined before,
during, and after the deed is done. Instead
of purchasing them, we made our cones.
For efficiency, we use two at a time.
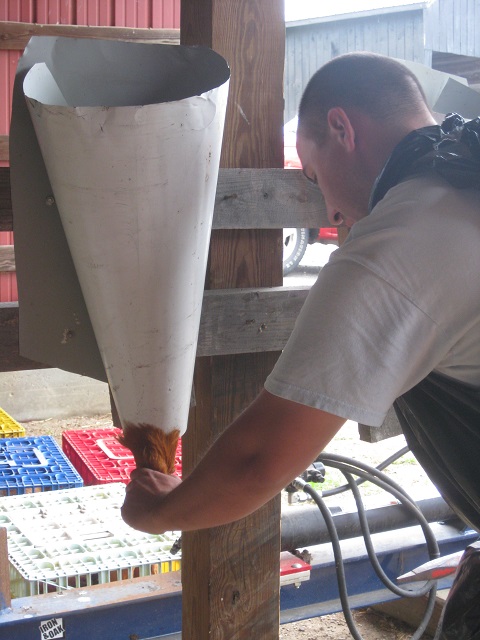 To begin, place the chicken head-first into the cone being
sure you can get a grip on the head from the bottom of the cone. Holding the head, gently pull downward to
expose the neck and jaw area. At this
point the bird may flap around, but usually it is so disoriented from being
upside-down that it will become still.
To begin, place the chicken head-first into the cone being
sure you can get a grip on the head from the bottom of the cone. Holding the head, gently pull downward to
expose the neck and jaw area. At this
point the bird may flap around, but usually it is so disoriented from being
upside-down that it will become still.  With your finger, find the jaw bone at the base of the beak.
Then, move slightly upward – though you may not actually feel it, you are
locating the main artery in the neck.
With a small, sharp blade and a swift, steady movement, slice deeply
into the neck from the back of the jaw forward being careful not to cut all the
way through to your hand. It is better
to cut deep than to cut too shallow. Generally, the nerves will immediately fire
causing the bird to flap and kick.
Prepare to be startled, but hold firm to the head until the activity
dissipates. The bird isn’t reacting to
senses or pain during this time; physiologically the nerves are firing the
muscles and the heart is pumping the blood out. After all the movement stops, allow the bird
stay in the cone to drain all the blood into a bucket. This may take a good 5 minutes. Letting the blood drain properly is essential
to the final product in your freezer.
With your finger, find the jaw bone at the base of the beak.
Then, move slightly upward – though you may not actually feel it, you are
locating the main artery in the neck.
With a small, sharp blade and a swift, steady movement, slice deeply
into the neck from the back of the jaw forward being careful not to cut all the
way through to your hand. It is better
to cut deep than to cut too shallow. Generally, the nerves will immediately fire
causing the bird to flap and kick.
Prepare to be startled, but hold firm to the head until the activity
dissipates. The bird isn’t reacting to
senses or pain during this time; physiologically the nerves are firing the
muscles and the heart is pumping the blood out. After all the movement stops, allow the bird
stay in the cone to drain all the blood into a bucket. This may take a good 5 minutes. Letting the blood drain properly is essential
to the final product in your freezer.  The Scald: Whatever your heat source (stovetop, fire,
propane burner), the water should be around 145F by the time you’re ready to
use it. Anything higher and you’ll be
slightly cooking the bird, anything lower and you won’t loosen the feathers
enough to do any good. Holding the feet
of the bird, plunge it up and down for approximately 45-60 seconds. Next, test some of the feathers. If they come out fairly easily, move to the
plucking station. If they hardly budge,
keep plunging a bit longer. Note on plucking
Roosters/Laying Hens: Anything older
than a young meat bird will be decidedly harder to pluck. The dark pin feathers may only come out with
pliers if they’re really stubborn. For
this reason, some folks choose to skin their mature chickens rather than pluck
them.
The Scald: Whatever your heat source (stovetop, fire,
propane burner), the water should be around 145F by the time you’re ready to
use it. Anything higher and you’ll be
slightly cooking the bird, anything lower and you won’t loosen the feathers
enough to do any good. Holding the feet
of the bird, plunge it up and down for approximately 45-60 seconds. Next, test some of the feathers. If they come out fairly easily, move to the
plucking station. If they hardly budge,
keep plunging a bit longer. Note on plucking
Roosters/Laying Hens: Anything older
than a young meat bird will be decidedly harder to pluck. The dark pin feathers may only come out with
pliers if they’re really stubborn. For
this reason, some folks choose to skin their mature chickens rather than pluck
them.  To Pluck:
Plucking by hand is fairly simple.
Simply take large fistfuls of feathers and pull in the same direction
they grow. Dump feathers in a bucket and
keep at it until all the feathers and quills have been removed. The only areas of exception may be those nearest
the head and feet (which will all be removed from the carcass anyway). Though it’s the simplest part of the whole
process, it can tend to be the slowest. Because
we were working with a sizable batch of birds, we used a Featherman brand motor-powered
plucker, as shown.
To Pluck:
Plucking by hand is fairly simple.
Simply take large fistfuls of feathers and pull in the same direction
they grow. Dump feathers in a bucket and
keep at it until all the feathers and quills have been removed. The only areas of exception may be those nearest
the head and feet (which will all be removed from the carcass anyway). Though it’s the simplest part of the whole
process, it can tend to be the slowest. Because
we were working with a sizable batch of birds, we used a Featherman brand motor-powered
plucker, as shown. 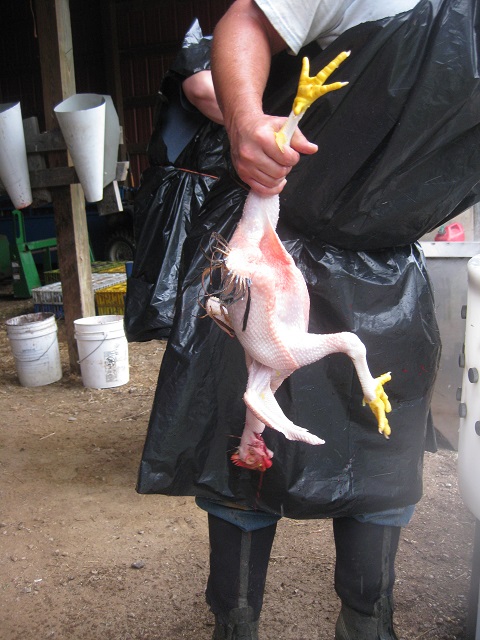 To Eviscerate: Sharp knives are essential to this part of the
process. A small, paring-size knife and
a good set of kitchen shears are the bare minimum of what you’ll want on
hand. First, remove the head leaving the
neck attached to the body. Next, remove
the feet at the elbow joint. If you plan
to clean and save the feet, set them aside; otherwise, put them in a bucket for
offal. The head and additional offal can
go in the same bucket.
To Eviscerate: Sharp knives are essential to this part of the
process. A small, paring-size knife and
a good set of kitchen shears are the bare minimum of what you’ll want on
hand. First, remove the head leaving the
neck attached to the body. Next, remove
the feet at the elbow joint. If you plan
to clean and save the feet, set them aside; otherwise, put them in a bucket for
offal. The head and additional offal can
go in the same bucket.  Face the bird away from you.
Holding onto the tail, lightly cut away the small oil glands (the size
of two pencil erasers) located at the base of the tail. You’ll know you’ve gotten all of them when
you don’t see anymore bright yellow.
Face the bird away from you.
Holding onto the tail, lightly cut away the small oil glands (the size
of two pencil erasers) located at the base of the tail. You’ll know you’ve gotten all of them when
you don’t see anymore bright yellow. 
Neck Area: Face the
bird toward you. Using the small knife
or kitchen shears gently cut longwise along the skin on the neck. With your fingers, separate the
skin from the cartilage so that the skin lays flat on your cutting surface. Next, find the trachea – a plastic-y feeling
tube with tiny ridges like an accordion straw that is attached parallel to the
neck. Pull the trachea loose from the
flesh of the neck so that it, too, is hanging loose. Next, find the sack-like crop attached to the
neck near the right breast (as the bird faces you). Depending on how recently the bird consumed
any food, the crop can be engorged like a sac full of bird seed or fairly limp
and a bit less conspicuous (like in our photo below).
Gently separate it from the nearby tissues along with the attached
esophageal tube that runs parallel to the neck.
At this point, the crop/esophagus, trachea, skin, and neck should be
separated from one another.

 Opening the Cavity: Once
more, face the bird away from you.
Holding the tail in one hand, lift the bird slightly so that its weight
is off the work surface and gravity is pulling the organs down and away from
you. With the paring knife in your other
hand, start at the hip bone and make a vertical incision that is off center
from the central axis of the carcass.
The incision should be fairly small, but large enough so that your hand
will fit inside the bird. Try not to cut
too deep or you may nick the intestines; too shallow and you’ll not pierce the
fatty membrane that encases the cavity.
Opening the Cavity: Once
more, face the bird away from you.
Holding the tail in one hand, lift the bird slightly so that its weight
is off the work surface and gravity is pulling the organs down and away from
you. With the paring knife in your other
hand, start at the hip bone and make a vertical incision that is off center
from the central axis of the carcass.
The incision should be fairly small, but large enough so that your hand
will fit inside the bird. Try not to cut
too deep or you may nick the intestines; too shallow and you’ll not pierce the
fatty membrane that encases the cavity. 
Organs of Note: Once
inside the cavity, begin gently removing intestines and organs. Feel for what seems like a
large stone covered in fatty tissue. It
will be hard and unmistakable (unless you’re working with a laying hen, in which
case that might be an egg). This “stone”
is the gizzard. Be fairly gentle, but
don’t be timid about pulling.There
will be some resistance from the gizzard because you are also pulling the crop
(and its contents) through the small opening near the neck. Ultimately, you want to remove the gizzard
and intestines leaving them hanging from the back of the carcass.
 |
| Gizzard |
During this time, look for the velvety,
burgundy-colored liver and the tiny, hunter-green gall bladder attached to it. As soon as you find it, cut the liver loose being
careful NOT TO RUPTURE THE GALL BLADDER.
Then carefully cut the gall bladder from the liver and put it in your
offal bucket. If
the gall bladder is ruptured, bright green bile will ruin what it touches. Discard the liver if it is contaminated with
bile and be sure to rinse the carcass cavity, work surface, and knife if
they’ve gotten bile on them. If you plan
to clean and keep it, cut the gizzard itself loose and set in a jar; otherwise
discard.
 |
| Liver and Gall Bladder |
 Removing the Vent: At this point, the rest of the guts should hang
from the back of the carcass attached only at the anus or “vent”. With your knife, cut the skin around the vent
as if you were drawing a “C” around it. Allow everything to fall into your offal
bucket. If there is a puncture to the
vent or you see any feces, immediately rinse it off with water so as not to
spread it elsewhere.
Removing the Vent: At this point, the rest of the guts should hang
from the back of the carcass attached only at the anus or “vent”. With your knife, cut the skin around the vent
as if you were drawing a “C” around it. Allow everything to fall into your offal
bucket. If there is a puncture to the
vent or you see any feces, immediately rinse it off with water so as not to
spread it elsewhere.
Emptying the Cavity: Continue
your biology lesson by identifying the fairly hard, acorn-sized heart located
at the front of the cavity toward the neck.
If you plan to keep the heart, set it aside in a jar. Everything else inside the carcass is ready
to be removed and discarded. Rake the
carcass clear with your hand. Pull out
any bits of stringy membranes or soft tissue that are left inside. Be sure to find the lungs which like to hide
in the “roof” of the cavity between the ribs.
The lungs are spongy feeling and almost fluorescent-red in color. You may also need to locate the trachea from
inside the carcass – it is attached at the base of the neck and should be
pulled out from the rear.
 |
| Lung |
 |
| Heart |

Rinse the chicken thoroughly inside and out with cold,
running water. Put it in a settling tank
(a cooler full of ice water) to pre-chill and rinse any leftover bits of bone or
blood. When the bird is quite chilled, remove it to
another cooler of fresh ice water to further chill until storing.
The Extras: The hearts and livers can simply be
rinsed and stored frozen or used fresh.
The gizzard and feet need a bit more work. Cut the gizzard in half lengthwise -- you
will likely find grass and pebbles inside.
Discard the contents and thoroughly wash the gizzard inside and out. Freeze or cook fresh. The feet need to be washed thoroughly and
peeled before use. Feet are a wonderful
addition to stock – most chefs swear by them!

Storage Tips: To ensure proper freezing, be sure the
chickens are adequately chilled before they go into the freezer. If needed, do a thorough check for leftover
pin feathers (like hair follicles) that may need to be removed with
pliers. Whether you choose to bag or
vacuum-seal is personal preference.
Note: For large birds, you may need 2-gallon freezer bags. Once the chickens are packaged and inside
your freezer, be sure they have plenty of air flow around them. Packing your freezer too tightly can actually
deter the freezing process causing meat to spoil before it is frozen.
No comments:
Post a Comment